Digitization Guidelines
This document is intended as a guide to digitization, specifically image and metadata capture for The Revolutionary City: A Portal to the Nation’s Founding, a collaborative digital project using Islandora software. It will be updated as modifications in the equipment, software and/or metadata schema necessitate.
Table of Contents
Preparing the Work Station
Before any digitization takes place, the technician should ensure that all of the following conditions have been met:
- Work on a clean, roomy, and tidy work table. Ensure that the work table is large enough to accommodate the objects and their housing enclosures. Be sure that the scanner bed and workspace are clean and free of dust. Use the lint-free cloths, if necessary.
- Wash and dry hands before working with library materials.
- Determine materials and supplies needed and gather them prior to digitization. This includes book supports, chlorine-free nitrile (medical) gloves for handling photographs, flatbed scanner inserts for digitizing slides, etc.
- Use only pencils near library materials. No ink or felt tip pens or markers, colored pencils, crayons, etc.
- Keep work spaces free of food and drink.
- Close books and folders and cover collection items when leaving the work area.
- Do not leave valuable items unattended while away from the workspace.
- Remove and replace materials in their containers carefully.
Handling Materials
It is vital to assess the physical condition of materials before subjecting them to digitization. Please contact the project supervisor or on-site supervisor if you have any questions or concerns about digitizing any item or if you encounter any of the following issues:
- Folds or creases obscuring text
- Cockled, undulating paper or photos that would be damaged by scanner pressure
- Tears greater than 1”
- Books with loose joints or detached spines or boards
- Restricted bindings
- Signs of active mold such as soft, furry spots. Active mold is sticky and can smear. Inactive mold is dry and powdery. Excessive powder should be sent to the conservation lab for clean up.
- Difficult formats, such as scrolls, accordion books, panoramas, or oversized items
Special Handling Notes:
- Bound material:
- BINDINGS: Weak, damaged, or restricted bindings require special care to prevent further damage. Handle, open, and close these items gently and using both hands. During image capture, place these items in a book cradle.
- BRITTLE PAPER: Handle brittle paper with extreme care. Artwork, documents, manuscripts, prints, photographs, and their mounts can also be brittle. Use clean hands to handle paper.
- FOLDOUTS: Don’t remove foldouts from books. Carefully open the foldout onto a support (like a board) during image capture.
- IRON GALL INK: As much as is possible, avoid touching areas of iron gall ink, as this promotes further corrosion.
- LOOSE ITEMS: A book may contain loose items between its leaves that may need to be temporarily removed to allow digitization of the contents of a given page. Make note of the item’s location, image the item itself, and then immediately replace it following image capture.
- PAGE FLATTENING: Don’t apply heavy pressure to books in order to flatten them for image capture. Such pressure can break the spine or loosen or break off brittle pages in a book. If a page cannot be imaged without being held down, options for applying gentle temporary pressure at the edges with book weights, silk thread, or polyethylene straps can be explored with the guidance of a conservator.
- Unbound textual material:
- BRITTLE PAPER: Handle brittle paper with extreme care. Artwork, documents, manuscripts, prints, photographs, and their mounts can also be brittle. Use a microspatula and clean hands to handle paper.
- IRON GALL INK: As much as is possible, avoid touching areas of iron gall ink, as this promotes further corrosion.
- OVERSIZE MATERIAL: Flatbed scanners cannot safely accommodate objects larger than 12.25” x 17” (Epson Expression 12000XL) or 11.5” x 16.5” (Epson GT-15000), therefore oversize material should be scanned on the CopiBook OS XD Book Scanner.
Scanning Equipment and Specifications
The type or medium of a material affects which tools are necessary to digitize it. Bound materials, unbound textual materials, maps and oversized graphic materials require different quality standards and imaging equipment.
APS maintains a variety of scanning, imaging, and digitization equipment. Their specifications are listed below:
| Equipment name | Type of equipment | Max scan area (H x W) | Best for |
|---|---|---|---|
| Epson Expression 12000XL | Flatbed scanner | 12.25” x 17” | Photographic prints, photographic transparencies, graphic materials, unbound textual materials (manuscript or printed) |
| Epson GT-15000 | Flatbed scanner | 11.5” x 16.5” | Photographic prints, graphic materials, unbound textual materials (manuscript or printed) |
| CopiBook OS XD | Overhead scanner | 20” x 28” | Maps, oversize graphic materials, bound volumes (manuscript or printed) |
| CopiBook Cobalt | Overhead scanner | 20” x 28” | Maps, oversize graphic materials, bound volumes (manuscript or printed) |

(Espon Expression 1200XL flatbed scanner pictured above)
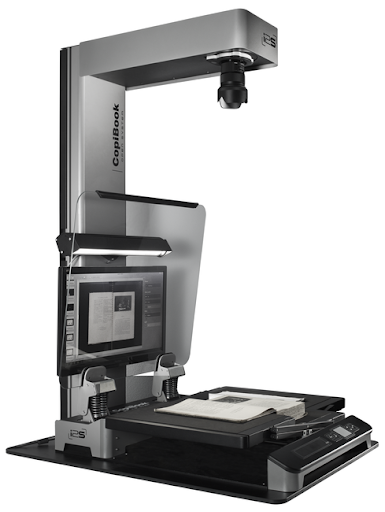
(Copibook OS XD book scanner pictured above)
- Bound material, maps, and oversized material should be scanned on a CopiBook Book Scanner. Detailed instructions on the CopiBook OS XD can be found here
- Unbound textual material should be scanned on an Epson Flatbed Scanner. Detailed instructions on the Epson Expression 12000 XL can be found here
- Extra oversized material will need to be consulted with your supervisor.
All digitized material should be scanned according to specifications based upon their item type. Follow the below standards for archival-quality scans:
| Item Type | Resolution (dpi) | Color Space | Bit Depth | File Format | Notes |
|---|---|---|---|---|---|
| Manuscripts & (Rare) typed/printed | 400 | Color | 24-bit | Raw TIFF | Higher resolution if item is poor in quality or legibility |
| Oversized items: Maps, Posters, etc. | 500 | Color | 24-bit | Raw TIFF | Higher resolution if item is poor in quality or legibility |
| (Non-rare) Typescript and printed books | 300 | Color | 24-bit | Raw TIFF | Higher resolution if item is poor in quality or legibility |
| Image(s) within a typescript and printed book | 400 | Color | 24-bit | Raw TIFF |
File Storage
Before scanning begins, it is important to create a folder to save the image files. All scanned images should be saved to the APS servers (if on-site) or an extrenal hard drive. Files will live here temporarily until they are ready for long-term, public-facing storage in the Rev City Portal.
File organization and naming is a vital component of maintaining a clear connection between a physical object and its corresponding digital surrogate. A good guideline to follow is to imagine being someone else, or you in a year, looking at your scans - is it obvious what they are? Are they unambiguously one specific folder or item in the finding aid?
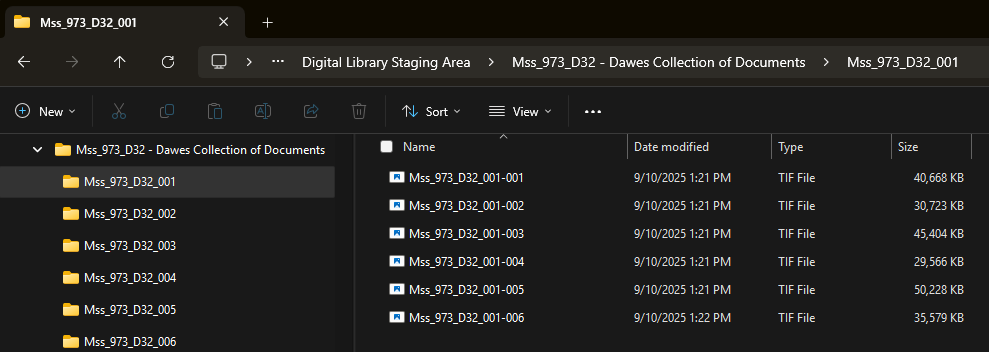
The files should be arranged by collection (prefixed with the collection call number or accession number).
- The folder name must be the same root as the file name
- Folder name = Mss_973_D32_001 ;
- Filenames within folder = Mss_973_D32_001-001.tif, Mss_973_D32_001-002.tif, Mss_973_D32_001-003.tif, etc.
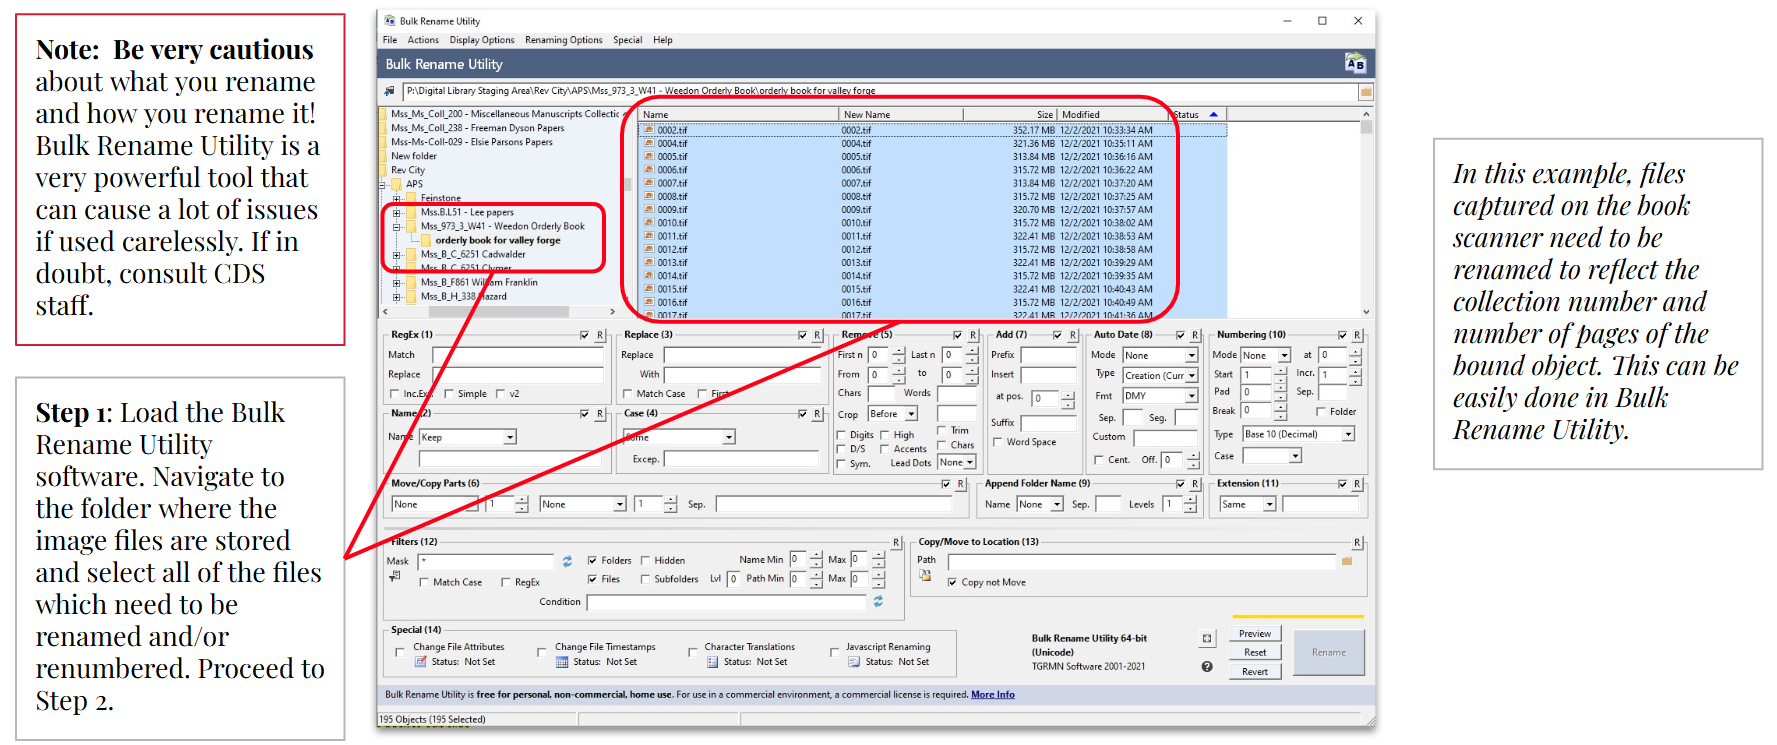
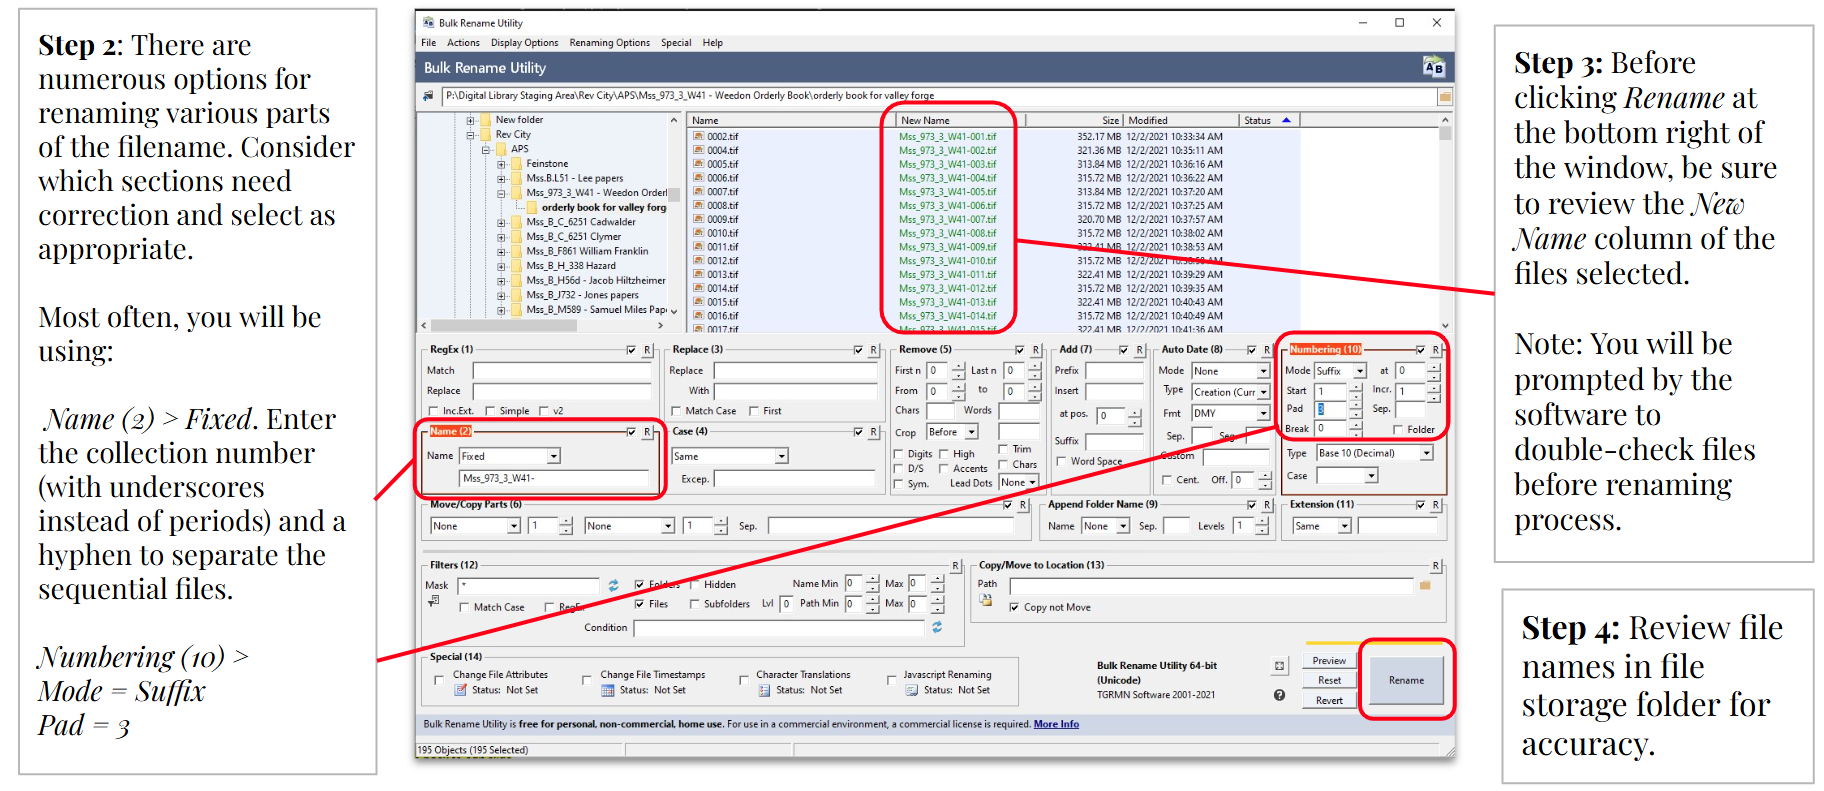
Use Bulk Utility Rename software to bulk rename files. Bulk Utility Rename is a powerful and user-friendly tool designed to efficiently rename multiple files and folders at once.
For specific information on file naming conventions, see The Revolutionary City Metadata Guidelines. For special cases, consult your project supervisor.
Back ups At least two full data backups should exist. One should be kept on-site, updated daily, and used as necessary. A second backup will be kept on the APS server, so that in the event that an emergency or disaster occurs within the partner institution, a preserved copy of collections content will still exist. The Project Team will retrieve the second backup at the end of each week.
Metadata Entry and Formatting
Uploads into the Rev City Portal will be carried out using Islandora Workbench, a command-line tool that allows creation, updating, and deletion of Islandora content from CSV data. This tool allows the simultaneous upload of items within multiple collections into the Islandora repository, complete with metadata. In order for Workbench to properly associate metadata with its parent and children, metadata entries must be formatted in a certain way.
There will be a Workbench sheet within each Collection Metadata Management spreadsheet. Required fields are marked in red. Please refer to The Revolutionary City Metadata Guidelines for detailed information about each field in the spreadsheet, including how to create metadata, specific data entry and formatting.
[add workbench screen capture]
In addition to the Workbench sheet, the Collection Metadata Management spreadsheet also contains an Inventory sheet where you will keep track of various stages of the digitization process, including scanning, metadata creation, and quality control. The Inventory sheet is meant to be used for tracking workflow, as well as a “working document” for creation of collection metadata during scanning and/or quality control. Digitization Technicians should enter “rough” metadata into the Inventory sheet and enter complete, correctly formatted metadata to the Workbench sheet.
Image Capture
For various scenarios below, always use your best judgment and when in doubt, consult the project supervisor!
- Leave 1 cm. of whitespace around the edges of the physical object when possible.
- Exceptions:
- If the entire item is visible, including the edges, and no text is cut off when scanning on the flatbed or book scanner, then it is okay to not have a 1cm border.
- If you are scanning a large item on a flatbed scanner that will need to be scanned in parts.
- Scan both sides of an item/page, even if blank.
- Exceptions:
- If scanning a bound volume with multiple sequential blank pages, scan a few of the blank pages and skip to the next page with content.
- Note: A page is considered a “page” if it contains text, sketches, watermark, postage or any other markings including contemporary writing by creator/recipient/collaborator and/or later markings by donor/archivist/cataloger.
- Scan material as it appears in person.
- For example - When scanning a folded letter, scan front/first page, then unfold paper to scan inside as one page, then fold again to scan back/last page.
- Exceptions:
- If material is too large to scan unfolded inside page, rotation on flatbed is necessary and scan inside as 2 separate pages.
- Scan all fold outs and inserts with care.
- Scan all parts:
- Page with fold out or insert attached and visible
- Page with fold out or insert removed (if possible) to capture obstructed text or image
- Insert by itself
- This will occur most often with bound material, however, loose material may also contain fasteners that cannot be removed.
- Scan all parts:
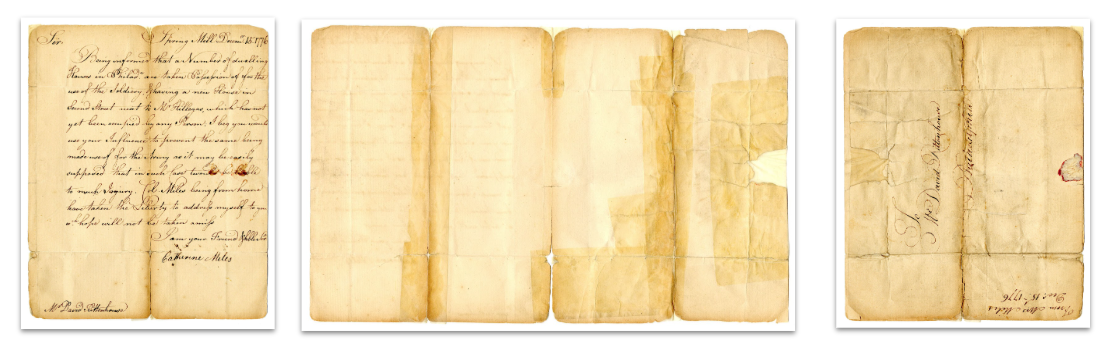
(example of a folded manuscript letter scanned as three separate images)
Post Processing
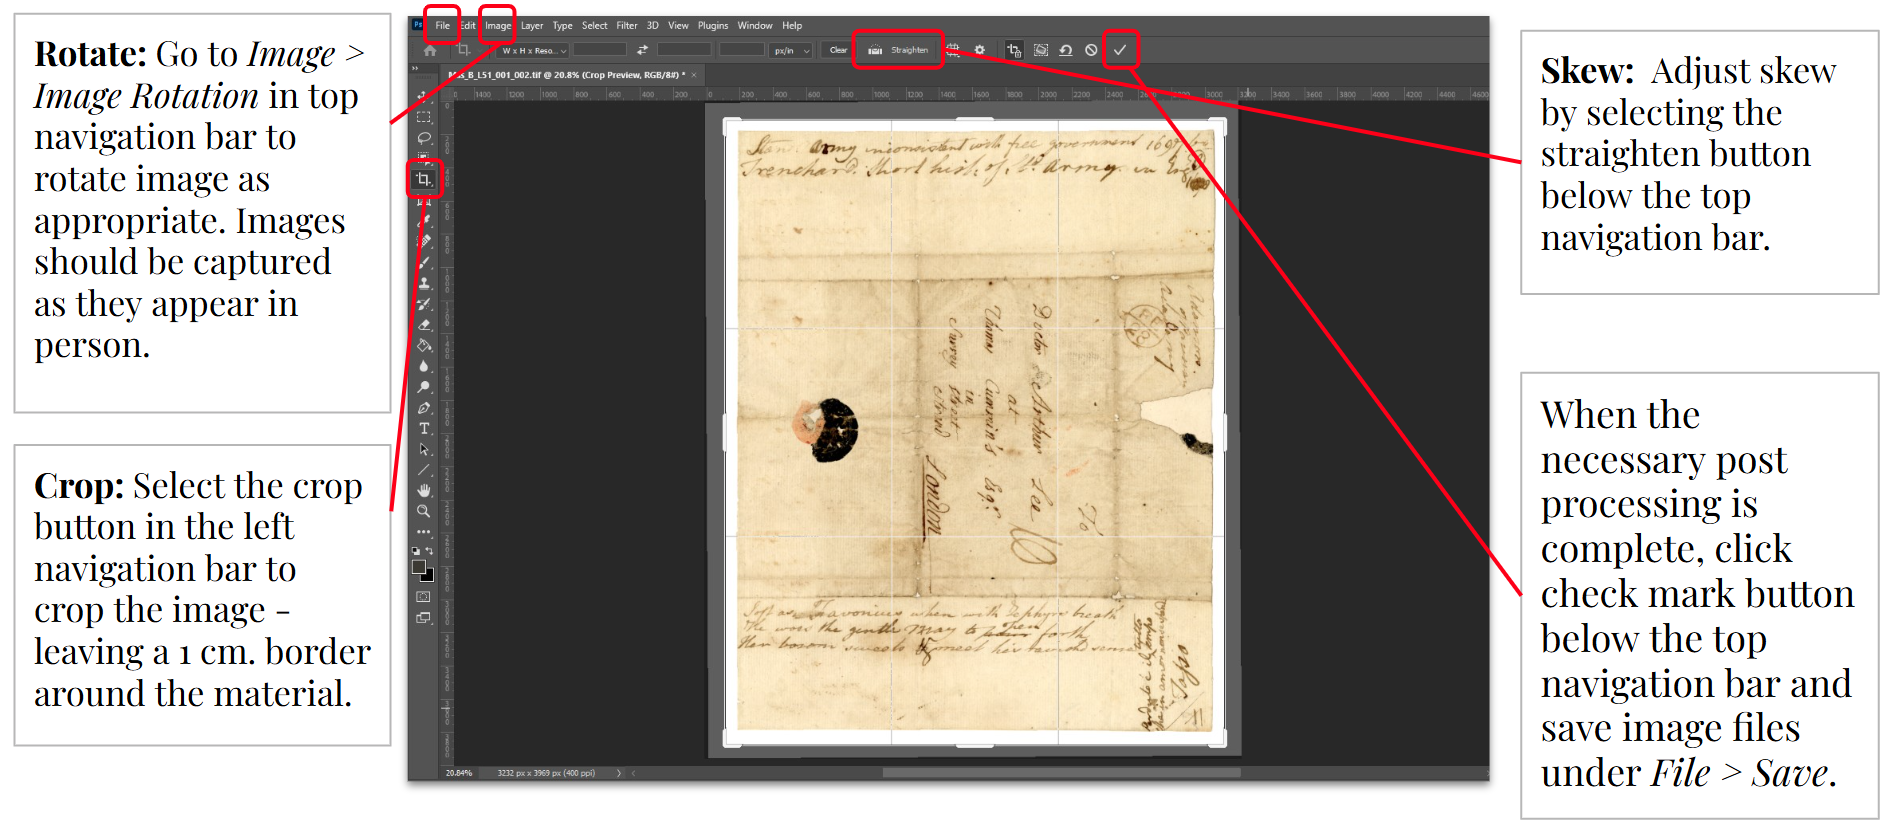
When viewing images in Image Viewer or Photoshop, check for:
- Orientation
- Rotate if needed.
- Scanned image should mimic the original. Once uploaded into the Portal, the digital object viewer allows for rotation of the object.
- Crop and border
- For items with multiple pages, maintain the same crop size from page to page (file to file) if possible. You can do this in Photoshop by starting the crop box from the upper left 0-point and measuring out to the same dimensions as the starting page. When you have the correct dimensions, use the arrow keys to center the crop box.
- If there are several pages or a whole book object that needs the same crop, you can run a batch process on the object.
- Skew
- Straighten only in extreme cases.
The Project Team will perform any post scan/digitization adjustments if needed. Please contact Project Data Manager if you have any questions or concerns about the faithfulness of the scanned image(s) to the original(s).
Quality Control Measures
Images:
- Image review should occur at every stage of scanning - including previewing, after scanning, and after any post-processing.
- Always perform quality control on scans at the end of a folder/box, day, or time scanning.
- Make sure scans reflect items in the box or folder.
- Keep the contents in the folder(s) and box(es) in order. If there is a question about the order of contents, please see institution staff.
Review this checklist once after digitization is complete and once after objects are uploaded into portal:
- Appropriate filename(s) reflecting collection material and order of files (page numbers)
- Correct format (should end with .tiff)
- Resolution (should be at least 400dpi in general)
- Multi-page object accuracy
- Page count (count the number of pages scanned, and then the number of pages belonging to the physical item)
- Page order (compare the digital scan to the physical item to ensure that the images are in the correct order. A quick way to do this is to compare the first and last word on each page.)
- Clarity/legibility
- Skew (is the image stretched or squashed at all?)
- Orientation (is the image the right way up? Is it straight? Is it centered?)
- Completeness (is any of the object cut off?)
- Color/contrast (is the color of the image reasonably accurate? Does the image look too bright or too dark?)
Metadata:
Metadata review should occur before and after upload into the Portal.
Review this checklist once after metadata creation is complete:
- Re-read each field for typos (spell check is encouraged, as google sheets does not do this automatically)
- Does the format of each field adhere to Workbench standards? (Be mindful of specific formatting for each field as Workbench will not upload metadata if incorrectly input into spreadsheet!)
- Does the file field in Workbench sheet match the scanned image filename?
- Is the metadata consistent throughout the collection and with current Rev City Metadata standards?
- Are all of the required fields filled in? Is there missing information about the object?
Review this checklist once after objects are uploaded into Portal:
- Are all required fields displayed accurately?
- Is any data missing or displaying oddly?